What if you could build your own Evernote-style app that works offline and syncs to the cloud, all using Flutter?
Digital note-taking is more about smart organization, beautiful design, and real-time syncing. If you’ve ever wanted to know how to build a notes app in Flutter, you’re at the right place.
Flutter has become one of the most popular frameworks for cross-platform app development, and for good reason.
For a note-taking app, this means your users can jot down thoughts on their phone, edit them on the web, and have everything synced automatically.
In this Flutter notes app tutorial, we’ll go step-by-step to build a powerful Notes App featuring:
- A Rich Text Editor for formatting and styling your notes,
- Tags & Filters for easy organization,
- Cloud Sync for real-time data backup, and
- A complete GitHub Code Repository you can clone and customize.
Let’s see how Flutter helps you combine performance, design, and functionality to build a notes app your users will love.
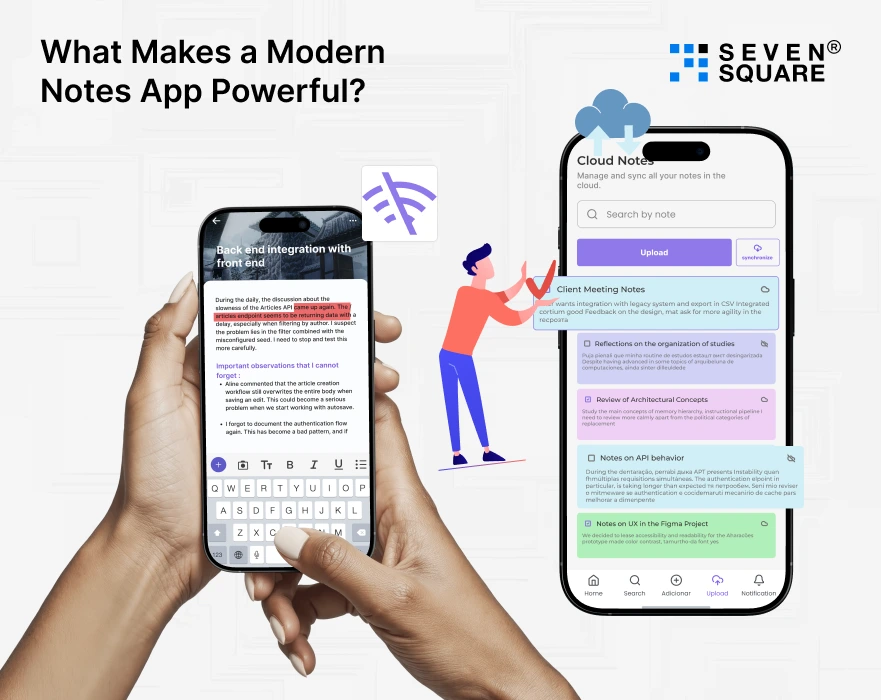
What Makes a Modern Notes App Powerful?

A modern notes app is how users expect intelligent features that help them organize ideas, access data anywhere, and personalize their writing experience.
To stand out in the crowded market, your Flutter notes app should include:
- Rich Text Editing: With features like bold, italic, headings, bullet points, and hyperlinks. This is where a Flutter rich text editor (like Quill or Zefyr) comes in.
- Tags & Categories: So users can quickly find notes based on context. A Flutter notes app with tags enhances productivity by grouping similar topics.
- Cloud Sync & Backup: Ensure notes are automatically saved to the cloud using Firebase, so they’re accessible across devices. This makes your app a true notes app with cloud sync.
- Offline Access: Let users read and edit notes without an internet connection, syncing changes once they’re back online.
These features transform a simple note-taking app into a productivity tool to give users the same convenience as popular apps like Notion or Evernote, but built entirely in Flutter.
How to Choose the Right Tech Stack for Your Flutter Notes App?
To make your notes app powerful, scalable, and smooth, picking the right stack is key.
Flutter’s open ecosystem provides all the tools you need, from the editor to data management and syncing.
- Rich Text Editor: Use flutter_quill or Zefyr, the two best Flutter rich text editor packages. They support text formatting, image embedding, and even Markdown export. These are the best Flutter packages for a rich text editor, trusted by thousands of developers.
- Cloud Sync with Firebase Firestore: Firebase Firestore makes real-time database management effortless. You can sync notes across devices, implement offline persistence, and secure your data with Firebase Auth.
- State Management with Provider or Riverpod: To handle live UI updates as users type or sync notes, Provider or Riverpod works perfectly. They help keep your app reactive and bug-free.
With this stack, your Flutter notes app will be fast, secure, and flexible, ready to deliver a native experience on all platforms.
Step-by-Step: Building the Flutter Notes App UI
To start building your Flutter Notes App, let’s design the main UI screens that make the app intuitive and functional.
Your notes app should feel familiar, have a clean layout, instant sync status, and smooth navigation. Here’s what we’ll build step by step:
- Notes List Page: Displays all notes with tags and a search bar.
- Add/Edit Note Page: Allows users to create or modify notes using a rich text editor.
- Sync Status Indicator: Shows whether notes are synced with the cloud.
This structure will give you a flutter notes app with tags and a search feature, plus an excellent user experience across devices.
Step 1: Notes List Page (with Tags & Search)
We’ll display all saved notes using a ListView.builder() and a simple search filter. Tags can be shown using Chip widgets.
            import 'package:flutter/material.dart';

                class NotesListScreen extends StatefulWidget {
                const NotesListScreen({super.key});

                @override
                State<NotesListScreen> createState() => _NotesListScreenState();
                }

                class _NotesListScreenState extends State<NotesListScreen> {
                final List<Map<String, dynamic>> notes = [
                    {'title': 'Meeting Notes', 'tags': ['Work', 'Team']},
                    {'title': 'Grocery List', 'tags': ['Personal', 'Shopping']},
                ];

                String searchQuery = '';

                @override
                Widget build(BuildContext context) {
                    final filteredNotes = notes.where((note) {
                    final titleMatch = note['title']
                        .toLowerCase()
                        .contains(searchQuery.toLowerCase());
                    return titleMatch;
                    }).toList();

                    return Scaffold(
                    appBar: AppBar(
                        title: const Text('My Notes'),
                        actions: [
                        IconButton(
                            icon: const Icon(Icons.search),
                            onPressed: () {
                            showSearch(
                            context: context,
                                delegate: NotesSearchDelegate(notes),
                            );
                            },
                        ),
                        ],
                    ),
                    body: ListView.builder(
                        itemCount: filteredNotes.length,
                        itemBuilder: (context, index) {
                        final note = filteredNotes[index];
                        return Card(
                            child: ListTile(
                            title: Text(note['title']),
                            subtitle: Wrap(
                                children: note['tags']
                                    .map<Widget>((tag) => Padding(
                                        padding: const EdgeInsets.only(right: 6),
                                        child: Chip(label: Text(tag)),
                                        ))
                                    .toList(),
                            ),
                            onTap: () {
                                Navigator.pushNamed(context, '/editNote');
                            },
                            ),
                        );
                        },
                    ),
                    floatingActionButton: FloatingActionButton(
                        onPressed: () => Navigator.pushNamed(context, '/editNote'),
                        child: const Icon(Icons.add),
                    ),
                    );
                }
                }

                class NotesSearchDelegate extends SearchDelegate {
                final List<Map<String, dynamic>> notes;
                NotesSearchDelegate(this.notes);

                @override
                Widget buildResults(BuildContext context) {
                    final results = notes
                        .where((note) => note['title']
                            .toLowerCase()
                            .contains(query.toLowerCase()))
                        .toList();

                    return ListView(
                    children: results
                        .map((note) => ListTile(title: Text(note['title'])))
                        .toList(),
                    );
                }

                @override
                Widget buildSuggestions(BuildContext context) => buildResults(context);
                }
Tip: Keep your note list UI minimal. Use a dark and light mode toggle to make it modern and user-friendly.
Step 2: Add/Edit Note Page
This screen will use Flutter Quill for the rich text editing experience.
We’ll integrate this in the next section, but for now, let’s create the basic layout.
           Scaffold(
                appBar: AppBar(title: const Text('Edit Note')),
                body: Column(
                    children: [
                    Expanded(child: Container()), // Placeholder for editor
                    const SizedBox(height: 10),
                    ElevatedButton(
                        onPressed: () {
                        // save note
                        },
                        child: const Text('Save Note'),
                    ),
                    ],
                ),
            );
Step 3: Sync Status Indicator
Users love knowing if their notes are synced or not.
You can show a small icon in the AppBar that changes color when syncing:
           AppBar(
                title: const Text('My Notes'),
                actions: [
                    Icon(Icons.cloud_done, color: Colors.green), // Synced
                    // or Icon(Icons.cloud_off, color: Colors.red),
                ],
            );
Now that the UI foundation is ready, let’s bring it to life with rich text editing.
How to Integrate Rich Text Editing? (with Flutter Quill)
To give your app a rich text editing experience, we’ll use Flutter Quill, one of the best and most stable packages available.
This section is your go-to flutter rich text editor quill tutorial, and it’ll show you exactly how to save rich text in Flutter (quill delta to JSON) and load it back.
Step 1: Install Flutter Quill
Add this to your pubspec.yaml:
           dependencies:
                flutter_quill: ^10.4.0
                flutter_quill_extensions: ^10.4.0
Then run:
flutter pub get
Step 2: Import & Initialize
            import 'package:flutter_quill/flutter_quill.dart' as quill;
            import 'package:flutter/material.dart';

            class EditNoteScreen extends StatefulWidget {
            const EditNoteScreen({super.key});

            @override
            State <EditNoteScreen> createState() => _EditNoteScreenState();
            }

            class _EditNoteScreenState extends State <EditNoteScreen> {
            final quill.QuillController _controller = quill.QuillController.basic();

            @override
            Widget build(BuildContext context) {
                return Scaffold(
                appBar: AppBar(title: const Text('Edit Note')),
                body: Column(
                    children: [
                    quill.QuillToolbar.basic(controller: _controller),
                    Expanded(
                        child: Container(
                        padding: const EdgeInsets.all(8),
                        child: quill.QuillEditor.basic(
                            controller: _controller,
                            readOnly: false,
                        ),
                        ),
                    ),
                    ElevatedButton(
                        onPressed: saveNote,
                        child: const Text('Save Note'),
                    ),
                    ],
                ),
                );
            }

            void saveNote() {
                final delta = _controller.document.toDelta();
                final json = delta.toJson(); // Save this JSON in Firestore
                print(json);
            }
            }
Step 3: Saving and Loading Rich Text as JSON
When saving notes, convert the text content to JSON format using:
final json = _controller.document.toDelta().toJson();
When retrieving notes from Firestore, convert it back:
            final doc = quill.Document.fromJson(jsonData);
            _controller = quill.QuillController(document: doc, selection: TextSelection.collapsed(offset: 0));
This makes your rich text data fully serializable and syncable across devices, one of the key features in any Flutter notes app with cloud sync.
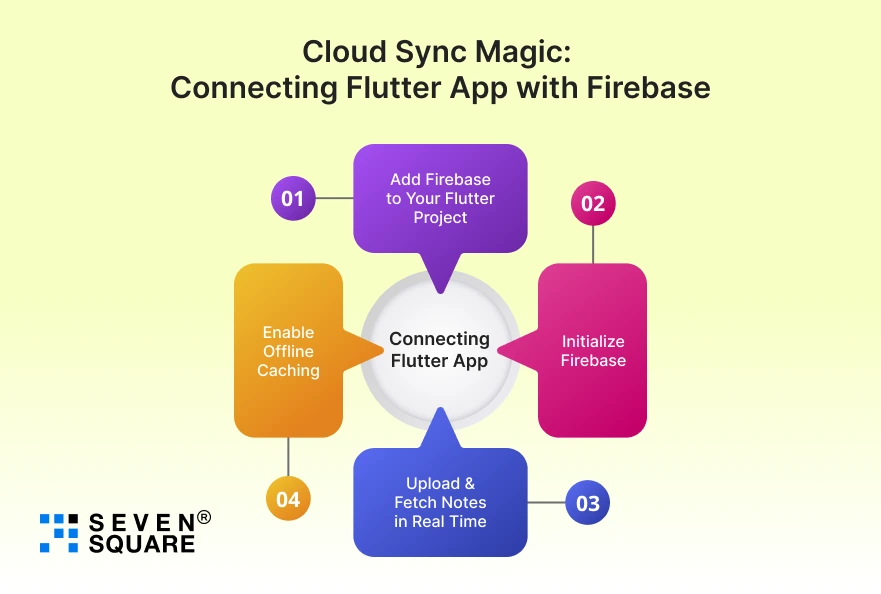
Cloud Sync Magic: Connecting Flutter App with Firebase

A notes app is only powerful when it syncs automatically across all devices.
Here’s how to build a cloud synced notes app in Flutter with Firebase and also how to implement offline sync and cloud sync in flutter notes app easily.
Step 1: Add Firebase to Your Flutter Project
Install Firebase CLI and initialize your project:
            firebase init
            flutterfire configure
In your pubspec.yaml, add:
dependencies:
             cloud_firestore: ^5.3.0
             firebase_core: ^3.5.0
Then run flutter pub get.
Step 2: Initialize Firebase
             import 'package:firebase_core/firebase_core.dart';

                void main() async {
                WidgetsFlutterBinding.ensureInitialized();
                await Firebase.initializeApp();
                runApp(const MyApp());
                }
Step 3: Upload & Fetch Notes in Real Time
             import 'package:cloud_firestore/cloud_firestore.dart';
             import 'package:flutter_quill/flutter_quill.dart' as quill;

                final firestore = FirebaseFirestore.instance;

                Future uploadNote(String id, quill.QuillController controller) async {
                final data = controller.document.toDelta().toJson();
                await firestore.collection('notes').doc(id).set({'content': data, 'updatedAt': DateTime.now()});
                }

                Stream<List<Map<String, dynamic>>> fetchNotes() {
                return firestore.collection('notes').snapshots().map((snapshot) =>
                    snapshot.docs.map((doc) => doc.data()).toList());
                }
Step 4: Enable Offline Caching (Firestore Persistence)
Firebase Firestore automatically supports offline mode. Just ensure persistence is enabled:
FirebaseFirestore.instance.settings = const Settings(persistenceEnabled: true);
This means users can view, edit, and add notes offline, and when they go back online, everything syncs automatically.
Here’s the Complete GitHub Code to Create a Powerful Notes App in Flutter with Rich Text Editor & Cloud Sync.
Build Smarter, Faster, and More Beautiful Flutter Apps with Us
We specialize in turning your app ideas into smooth, powerful, and future-ready mobile experiences.
- Our team has deep experience with Flutter rich text editor integration, using tools like Flutter Quill and Zefyr to create smooth note-editing experiences.
- We build apps that sync data in real-time with Firebase Firestore, offering smooth offline + cloud sync for users across devices.
- From tags and search filters to custom editor toolbars, we design clean and intuitive interfaces that users love to use daily.
- Every Flutter notes app with cloud sync we develop includes Firebase Auth, encryption, & structured Firestore models for maximum security and scalability.
Want a Customized Flutter App? Contact Us Now!
What Are the Pro Tips to Take Your Flutter Notes App Further?
Once your base app is ready, why stop there? With a few improvements, you can turn it into a feature-packed productivity tool.
- Add Smart Reminders: Integrate push notifications so users never forget an important note or task.
- Export Notes to Markdown: Developers often search for how to export notes as markdown from flutter quill & implementing this will make your app stand out instantly.
- Integrate AI Summaries or Text Enhancements: Use AI APIs to summarize or rephrase notes automatically.
- Allow Background Sync: With Cloud Functions, you can keep your data updated even when the app isn’t running.
These improvements change your app from a basic notes tool into a professional-grade writing assistant.
Build It, Sync It, Own It
With Flutter, creating a powerful, cross-platform notes app with rich text editor, tags, and cloud sync has never been easier.
If you are building your own branded note-taking solution then the possibilities are endless.
You now know the exact tools, architecture, and tricks to bring your idea to life, from Firebase Cloud Sync to Flutter Quill integration.
FAQs
- You can store the Quill editor’s Delta format as a JSON string in Firestore.
- When fetching, simply convert it back to Document.fromDelta() for rendering.
- Yes, Flutter Quill supports local editing.
- Combined with Firestore’s offline persistence, your notes sync automatically when you reconnect to the internet.
- Use Firebase Authentication for user sign-in, Firestore security rules to limit access, and encrypt local data with Hive or SQFlite.
- Use Firestore’s local cache + background sync. This lets users edit offline and automatically push updates once online.